Quick Setup Guide
- Plug in your power cables to both your monitor and PC.
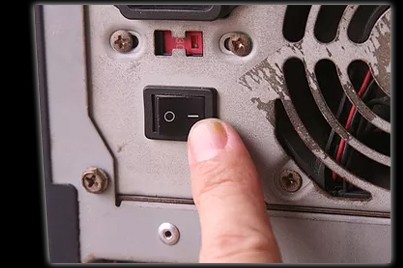
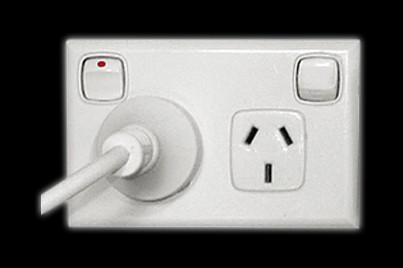
- Check the power switch on both your power point and the back of the computer is in the on ( I ) position. Be sure NOT to tamper with the red voltage selector switch on the back of the PC however, as if set to the wrong voltage, this will blow up the power supply and cause physical damage to the rest of the computer.
3. Try a different power cable if you have one and also try a different power point.
- Plug in your data cable from your monitor to the back of your PC. This may be either VGA, DVI, HDMI or Displayport depending on the exact system you purchased from us.
- Confirm that you are not connecting the monitor to the on-board video outputs usually located on the upper half of the computer and are instead connecting the monitor to the dedicated video card outputs located on the lower half of the computer. If your monitor does not have the same connection, then you will need to purchase an adapter. Note: you only require one (1) data cable to connect between the computer and your monitor. Do NOT connect multiple cables between one monitor and the PC. You are not required to use every cable that comes with your monitor.

3. Turn on the monitor and make sure to change between the input sources, most monitors will have the feature for selecting the input that the monitor is receiving a signal from. Make sure you have selected the proper input.
4. Next, plug in your peripherals such as keyboard, mouse and bluetooth/WiFi adapters if you purchased them. These peripherals will be a standard USB connection and can be plugged into any USB port on the computer. For the WiFi adapter, we recommend plugging it into the back of the computer for best reliability.
- Plug your headset or speakers into the computer. We highly recommend plugging into the ports on the back of the computer for best reliability and sound quality. Please avoid the ports on the top of the computer as these are generally unreliable.
- Confirm that you are NOT using a SINGLE ended connection. These connections are becoming more common and featured on most new headsets, however they are designed for gaming consoles and will NOT work on most PC’s. You will need a splitter adapter for it to work. You need one headphone and one microphone plug.

3. If you want to avoid the trouble of the above all together, we highly recommend using a USB audio adapter. These are universally compatible, plug and play, have clearer sound and are much more reliable. They can be found on ebay for only a few dollars. Some of our systems may include one of these adapters in the box. These USB adapters take the analogue signal of your headset and convert it to digital.
